The way you present your product is crucial for attracting customer attention, especially in the expanding e-commerce landscape. In this competitive environment, businesses are constantly exploring innovative methods to stand out. Ghost mannequin photography is one such technique that has revolutionized online product display.
Ghost mannequin photography, also referred to as “invisible mannequin photography,” tackles the issue of presenting products realistically without the presence of a visible mannequin or the expenses linked to hiring a live model. This technique produces a seamless and captivating portrayal of products, highlighting their form, fit, materials, and intricate details.
When it comes to ghost mannequin photography services, there’s much to consider, from selecting the appropriate equipment to mastering post-production details. In this blog, we will delve into these aspects to provide you with valuable insights. You’ll find all the essential tips and steps needed to master ghost mannequin photography, enabling you to showcase your products effectively for optimal advertising results!
Comprehensive Guide on Mastering Mannequin Photography Techniques
Selecting the Perfect Shooting Equipment
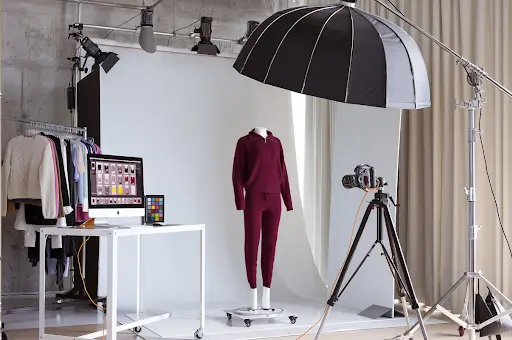
Setting up the perfect shoot equipment is the foundational step in mastering invisible mannequin photography. To achieve professional results, start with:
- A modular mannequin that allows for various poses and easy dressing.
- Invest in a high-quality DSLR or mirrorless camera with manual control for precise settings, such as the Canon EOS R6, paired with a distortion-free lens like the Canon RF 50mm f/1.8 STM.
- Lighting also plays a pivotal role, and soft, evenly distributed studio lights or softboxes are essential for highlighting garment textures without harsh shadows.
- Choose a neutral backdrop, preferably white or light gray, to keep the focus on the clothing. Ensure the mannequin is not too close to the backdrop to avoid abrupt shades.
Camera Settings and Composition Tips
The second step in mastering ghost mannequin product photography techniques involves complete attention to camera settings and composition for optimal results.
- Begin by placing the camera at the midpoint of the garment’s height to achieve a neutral perspective. Ensure it is mounted on a steady tripod and leveled for stability.
- Set the manual white balance to achieve true color reproduction, and for an even more precise hue rendition, consider using a color checker card.
- Consistency in exposure is crucial, so employ manual settings throughout the photo session.
- Keep ISO as low as possible (between 100 to 200) to avoid graininess and preserve details, especially when utilizing flash.
- When selecting the aperture, opt for a higher f-number, preferably above 11, to maintain focus on the entire garment and avoid highlighting specific areas.
- Conducting a test photo session is essential to verify even lighting, ensuring that shadows are minimized for a professional finish.
- To enhance the versatility of your product shots, use a telephoto zoom lens, which minimizes distortion and provides flexibility in shooting closer to smaller objects or farther from larger ones.
Capture Ghost Mannequin Effect On Set
During the production phase of ghost mannequin photography, the focus is on setting up the scene for capturing images of garments with a seamless and realistic effect. This involves using a mannequin with removable parts, such as the torso and limbs, to create the desired visual illusion.
First, the garment is carefully styled and dressed on the mannequin. This step is crucial to ensure that the clothing looks natural and well-fitted on the mannequin.
Next, the visible parts of the mannequin, such as the neck, sleeves, and any other areas that might be visible through the clothing, are strategically removed. This process is done to create the appearance of an invisible figure wearing the garment when the final images are captured.
Attention to detail is essential during the production phase to ensure that the clothing is properly arranged, and the mannequin parts are seamlessly removed without causing any distortion to the garment or the overall image.
By carefully executing these steps during the “on set” phase, photographers can achieve professional and appealing ghost mannequin images that effectively showcase the fit, form, and details of the clothing, enhancing the overall visual presentation for online retailers and fashion brands.
Create the Ghost Mannequin Effect In Post-Production
In this process:
- Open your mannequin images in Photoshop, creating a new background layer for the mannequin image filled with white. Label your layers for better organization.
- Using a selection tool, carefully choose the product in the mannequin image.
- Zoom in and employ tools like the quick selection, lasso, or a pen tool to ensure precision. Due to the color separation between the product and the white background, removing the mannequin becomes more straightforward.
- Refine the mask, ensuring it tightly outlines the product, removing the background and mannequin.
- Repeat these steps for images that capture inside-out details.
- Combine the images by dragging the inside-out details image’s mask onto the ghost mannequin product image.
- Organize the layers with the inside-out details image beneath the mannequin image.
- Adjust the inside-out details layer’s position and proportions to seamlessly fit behind the mannequin.
Make sure you give complete attention to refining the ghost mannequin effect, ensuring a professional and realistic appearance. After merging both photos and eliminating unnecessary parts of the inside-out details image while hiding the mannequin layer, layers are cleaned, and alignment in the neck and shoulder area is ensured.
To enhance the natural look of the garment, there needs to be fine blending and adjustment of shadows. Opacity and blending modes of the front and back layers are fine-tuned, and subtle shadows are introduced to mimic the original lighting conditions. This step adds depth and dimension to the clothing, contributing to a visually appealing final image.
Color correction becomes paramount in achieving consistency across the garment. Adjustment layers like Curves, Hue/Saturation, and Color Balance, are employed to ensure a cohesive and vibrant color representation.
Wrapping Up
Becoming proficient in ghost mannequin photography goes beyond merely taking product photos; it entails showcasing them in a manner that enthralls customers and distinguishes them in a competitive market. Adhering to these steps yields polished and captivating product images that enhance brand recognition and drive sales in the ever-evolving realm of online retail.
Businesses in need of professional ghost mannequin photography services should consider hiring Elena Vels Studio to meet their specific needs. Contact us today to discuss your project needs and bring your products to life with a professional service.


